For industrial brakes, the nameplate is not decoration—it’s the quickest way to confirm you received the correct configuration and to avoid the most common on-site failures: wrong voltage coil, wrong thruster type, incorrect torque class, or missing accessories. A 30-second nameplate check can save hours of troubleshooting after installation.
This article explains how to read an industrial brake nameplate and model code, what parameters matter most for selection and maintenance, and how to verify them quickly on site. Examples reference common products in our range such as YWZ13 electro-hydraulic drum (block) brakes, SH hydraulic fail-safe disc brakes, and SE electromagnetic fail-safe brakes.
[Image Placeholder] Nameplate close-up with callouts: model, torque, voltage, thruster/coil, IP rating, serial number, standard, date.
1) What information is typically on a brake nameplate (and what is actually important)
Different brake types show different fields, but most industrial brake nameplates include:
- Manufacturer and product series
- Model code (often contains size, torque class, and configuration)
- Rated braking torque (N·m)
- Actuation data (coil voltage or hydraulic release pressure / thruster model)
- Power supply (V, Hz, phase) for actuators
- Protection rating (IP), and sometimes ambient temperature range
- Serial number, manufacturing date, standard reference
In the field, the top 5 items to verify are: model code, torque rating, release method (thruster/coil/hydraulic), voltage/frequency, and serial number matching documentation.
2) Model code basics: what a model typically encodes
Industrial brake model codes are usually structured like “series + size + configuration.” While each product family has its own rules, most codes include:
- Series identifier: tells you the brake type and mechanism (drum/block, disc caliper, electromagnetic).
- Size number: typically correlates with disc diameter, wheel diameter, or frame size—often the first predictor of torque capacity.
- Variant letters: can encode spring arrangement, manual release, corrosion package, sensor options, or environment rating.
Example idea (not a universal decoding rule): In many drum brake series, the “size” corresponds to the brake wheel diameter class; in many disc caliper series, the size correlates with disc thickness/diameter range and clamp force class.
If you’re writing product pages, it helps SEO and buyer clarity to provide a “Model Code Explanation” section per series (YWZ13 / SH / SE). That reduces RFQs that only say “need brake for crane” and improves conversion quality.
3) Rated braking torque: what the number means (and what it does not)
Nameplates commonly list rated braking torque in N·m. Two practical points:
- Torque is conditional: it depends on friction material, adjustment/clearance, and temperature. A brake can meet torque cold and drift hot if duty is high.
- Torque is not thermal capacity: a brake can have enough torque but still overheat if stops/hour are high.
If you want a quick application check from the nameplate torque, convert torque to tangential force at the friction radius:
F_t \approx \frac{T}{R_{eff}}This is useful for sanity-checking whether the mounting structure and fasteners are likely to handle the braking load without slip.
4) Actuation fields: the most common mismatch on site
Many “brake defects” are actually actuation mismatches. What to look for depends on brake type.
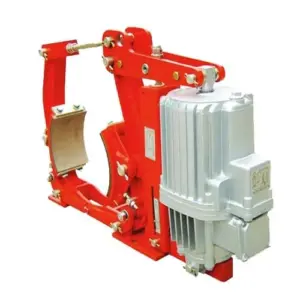
A) Electro-hydraulic thruster brakes (example: YWZ13)
For YWZ13 electro-hydraulic drum brakes, the nameplate often indicates the compatible thruster model and power details. On site, verify:
- thruster model matches the brake configuration (stroke and thrust must match)
- motor supply voltage and frequency (e.g., 380V/50Hz) match the site
- IP rating and environment (outdoor, dust) match the project requirement
Why this matters: wrong thruster version can still “move,” but not achieve full release. That creates dragging and overheating.
B) Hydraulic fail-safe brakes (example: SH)
For SH hydraulic fail-safe disc brakes, the nameplate often includes release pressure range or a rated release pressure. Verify:
- hydraulic station relief/working pressure can reach the required release pressure
- hose and fitting ratings meet pressure and environment
- any switches (brake-open, wear) match the control logic and voltage
Field note: “Pressure is correct” at the hydraulic station does not guarantee pressure is correct at the brake port if the piping is restrictive. If you see slow release or delayed apply, measure pressure at the brake.
C) Electromagnetic fail-safe brakes (example: SE)
For SE electromagnetic fail-safe brakes, the key nameplate risk is wrong voltage (and wrong rectifier/power supply behavior). Verify:
- coil voltage (AC or DC as specified) matches the brake power supply
- rectifier type matches coil rating (fast release vs standard, if specified)
- terminal wiring and cable gland sealing match environment
Fast on-site check: measure coil voltage at the brake terminals during release. Many issues come from cable voltage drop or wrong rectifier wiring.
5) IP rating and environment: a nameplate item that predicts maintenance cost
IP rating is often ignored until dust and water cause sticking, insulation issues, or switch failures. If your brake is used in:
- high dust: aim for IP6X dust-tight for electrical parts
- outdoor rain / washdown: IP65/IP66 is often specified for enclosures and thruster motor housings
- coastal salt: define corrosion package beyond IP (coatings, hardware, cable glands)
Nameplate IP fields help you confirm you received the correct “environment package,” not the indoor default.
6) Serial number and traceability: the key for spare parts correctness
Industrial brakes often have configuration variants that are not obvious by appearance (spring pack, lining grade, switch options, special coatings). The serial number ties the brake to:
- factory inspection record and measured clearances
- lining/pad specification and batch
- thruster/coil version and wiring revision
- spare parts compatibility
Maintenance best practice: record the serial number and take a nameplate photo before the brake goes into service. It reduces wrong spare parts orders and improves response time when troubleshooting.
7) A 60-second on-site nameplate verification routine (copy/paste)
- Photo the nameplate and terminal box label.
- Confirm model code matches the drawing/BOM.
- Confirm rated torque (N·m) matches the project requirement.
- Confirm actuation method and key parameter (thruster model + voltage/frequency, or release pressure for hydraulic, or coil voltage for electromagnetic).
- Confirm IP rating/environment package matches site conditions.
- Record serial number into maintenance system for spare parts and traceability.
Need help creating model-code explanation blocks for your product pages?
If you tell me which brake series you want to publish first (YWZ13, SH, SE, YPZ2, etc.), I can draft a “Model Code Meaning” section that is both buyer-friendly and SEO-friendly: it will list the parameters, what each segment typically indicates, and how customers should confirm configuration during ordering and acceptance.
[Internal Link Placeholder] Contact us for model-code confirmation and spare parts matching by serial number.